Oct
10

Signs of a winterized sprinker system

We have many calls in the fall wondering if an irrigation system has been winterized.  Our crews generally call to inform that we will be winterizing prior to the visit.  If you can’t remember if you received the call a few quick looks will help you determine if it has already been done.

First find your VPB on the outside of your home.  It is generally brass with a black plastic top.   Confirm that the valve handles are at 45 degree angles and the test cock valves are open at 45 as well.  Leave them in this position as it allows any moisture to excape.

VPB winterized marked

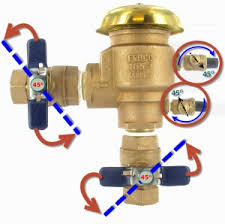
VPB in off position arrows showing winterized position


TWS

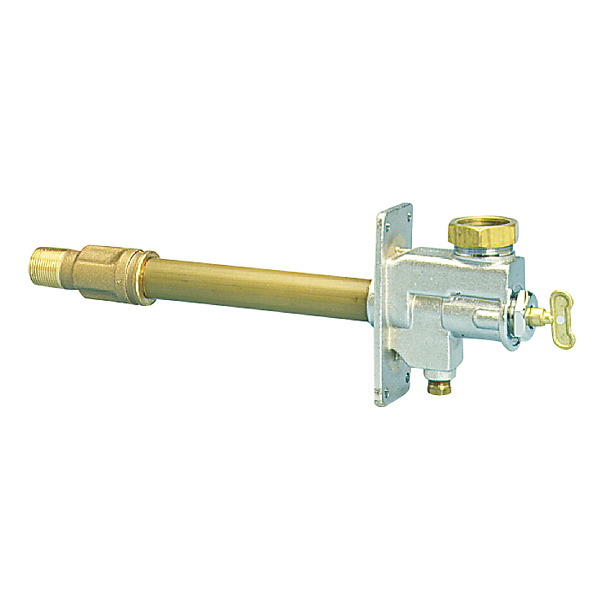
TWS. There are several types but all have a plug that will drain water- do not loosen the key area nut!

If you have a TWS(through the wall shut off) you will find that the brass plug on the bottom has been removed and is taped on the pipe to allow it to drain.  TWS act like a frost free faucet or hose bib on the exterior of your home in which we can turn off with a special key without meeting anyone.

finding irrigation pipes under house

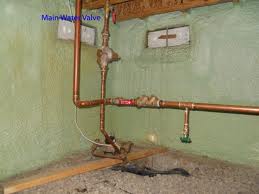
Green handle valve is drain for irrigation system in this picture. Shut off is red handle to the left of it before the back flow preventor.

If you have neither of these you would have to confirm the water source is off and that it has been drained which is generally in the crawl space- this may be difficult to tell if it has been drained so a phone call may have to occur to confirm.

IF we have had a few hard freezes below -20 the pipes would mostly likely have burst and you would have a beautiful ice sculpture to confirm it hadn’t been winterized.

Aug
19

Weathermatic Programming Link

Having issues or just want to learn more?  Here is a link to Weathermatic’s own list of tips, videos and instructions.  Check it out..and if you still have issues give the office a call and one of our irrigation techs can talk you through it or make an appointment to show you personally.


Click here for link→ Weathermatic Programing Videos


Aug
14

Weathermatic Controller Basics


To program or adjust your irrigation controller you will need to think through a few items.  You will want to know what area each zone waters.  Usually this is written in your manual inside the controller.  Then you will want to determine when, how long and which days you want to water each zone. Some basic starting point would be…

  • Turf lawn 20 minutes on rotors and 10 minutes on sprays
  • Drip on shrubs 30 minutes
  • Native areas 20 minutes on rotors and 10 on sprays

After you have determined this you can then group the zones that need the same days watering and start time into  a program.   Then enter start time and days per program.  Each zone with in the program will be ran in succession at the start time programmed  on the days requested but the run time for each zone will be different as per programmed in zone run times.  An example would be..

  • Program  A for turf lawn areas-every other day in spring and daily in July and August, start at 5am
  • Program B for drip on shrubs-once a week or 2 times a week in July and Aug, start at 4 am
  • Program C for native areas-2 times a week, start at 8am

Careful!  You only need ONE start time per program but will need zone run times for each zone.  If you find that you would like a second start time for the program due to excessive heat in July or Aug you can then add  a pm start time or one very early am.  We recommend watering in the early morning hours just before sun rise to reduce evaporation but all reduce the amount of time before the sun will dry the leaves as to reduce mold issues.

Once you have programmed your controller or adjusted it make notes as to what you have done so that you will be able to refine your landscapes needs.

If you have the Auto Adjust setting you will need to have all the information programmed on the left side of the dial.  When we install the sensor we fill in this information and it is saved in your controller.  Adjustments you may want to  play with is the Add/Subtract.  This is how you can inform the sensor to increase or reduce the watering time it determines with the information it is accumulating.  If you adjust the zone run time it will NOT affect the end result, you must adjust in the Add/Subtract section.  The Auto Adjust listens to the days you tell it to water and the start time but it determine the watering time on the weather data and past watering times.

If your Auto Adjust or Sensor show orange or red this means that the watering is on hold due to weather.  To determine if you have communication between the sensor and the panel look for the antenna icon in the bottom, middle of the display.  If the controller will not go into Auto Adjust mode it may be due to lack of communication  or due to missing information.

For more information check out the You Tube videos or look up the trouble codes in the manual inside you panel


Aug
14

Weathermatic Auto Adjust Setting

Aug
14

Weathermatic Controller Videos

Older Posts »